
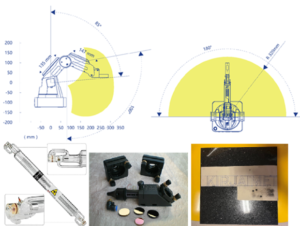
Dobot Magician is a multifunctional desktop robotic arm for practical training education. Installed with different tools, it can perform different functions such as 3D printing, laser engraving and drawing. The robotic arm in this case will control a laser system to engrave letters on a gravestone, and the aim of the topic is to design and simulate the laser engraving environment for it. This is the practical implementation of the thesis work.
In order to design the appropriate laser engraving environment for Dobot, the specification of the supplied devices and tools such as Dobot Magician, the laser system and the gravestone needed to be emphasized. In addition, Lean Concept and Safety Ethic were also used as a method to design a safe and effective environment for Dobot.
The idea of designing a laser engraving environment for Dobot was to create a box or enclosure where Dobot Magician, laser system, and workpiece were put inside. Dobot was fixed and the workpiece was moved by Linear Actuator. The enclosure also included a lid to open and close.
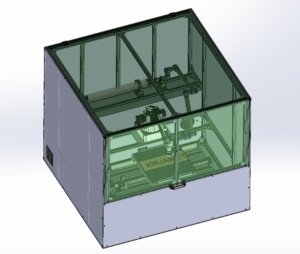
The enclosure was designed on Solidworks software. The frame was designed mostly with 20×20 Aluminum extrusions. The first floor was to attach Linear Actuator, the second floor was to attach Dobot, and the third floor was to attach the laser system. Under the third floor and behind the second floor, there was an area to hide the electronics and the wires. The frame was covered with aluminum sheets and the lid was covered with acrylic sheets to protect the user’s vision from the laser beam. The lid was also attached with hinges and a handle. The laser system consists of a laser pipe, an Articulated Laser Arm, and a Laser Head Mount. The laser pipe and Articulated Arm were mounted on the third floor. Laser Head Mount was connected to Articulated Arm and Dobot Magician as an end effector. Linear Actuator was customized with two layers so that the workpiece could be moved in X and Y directions. The fixture of the workpiece, which was attached to the Linear Actuator, was designed as a drill press vise. In the area for hiding the electronics, the ventilation system was installed with two holes for extracting the hazardous smoke from the engraving process. After all of the 3D models were assembled, the laser engraving enclosure was complete and designed to be robust, user-friendly, easy to detach for maintenance and other requirements.
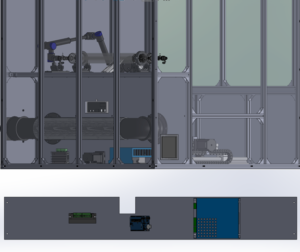
However, the enclosure could not function without inner electronics and extra accessories. The electronics, which were hidden in the same area as the ventilation pipe, are the CO2 laser supply, motor driver, and Arduino Rev3. The power supply was used to power up the laser system. The motor driver was used to make two motors of the Linear Actuator function properly. Arduino was used as a bridge for interaction between Dobot and other devices. In terms of extra accessories, the fan blower was used to extract the smoke through the blast gate. The water cooler for the CO2 laser was utilized to keep the water cool and circulate it among the laser pipe and the water tank. The air pump was used to push the pressed air out of the Laser Head Mount’s nozzle so that the smoke cannot affect the inner lens. The lift strut should be installed for supporting the lid and the LED strips should be installed around the inner surface of the enclosure to provide enough light source. The cable guide was used to protect the wires of the motors when the layers of the Linear Actuator were moved. Moreover, the cable guide was installed in a position where it can orient the wires to the hiding area. Last but not least, the rubber sheet was used as a gate to connect the internal wires to the devices outside the enclosure without smoke leaking.
The flowchart and schematic of the system were drawn so that the logic of the system could be comprehended for programming the simulation. In order to run the simulation, all of the function devices such as Dobot Magician, Articulated Laser Arm, Laser Head Mount, Linear Actuator needed to be modeled in Visual Components software. After all of the devices were modeled, the layout was imported with proper positioning. The movement of the Articulated Arm was synchronized with the movement of Dobot. The interface of Dobot and Linear Actuator were connected to each other. Lastly, the movement of the system was programmed. Basically, Dobot engraved different kinds of letters at the same point and Linear Actuator moved the stone to one side after Dobot finished a letter. Organizing the movement this way could help the designer save more space, improve and minimize the size of the enclosure. The stone was selected to move while Dobot was fixed because the laser system was attached to Dobot so the movement of the stone could save more space for designing the enclosure.
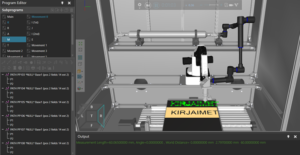
The simulation showed that all of the devices were modeled and functioned properly. The engraving process was safe, efficient, and compatible, while the model of the environment was robust, user-friendly, and easy to attach and detach. The simulation was well operated without any collision between devices. Although the price for manufacturing the real-life product is more expensive than a typical laser engraving machine, the thesis work explored in this text can open the opportunity for further Dobot research in the future.
Student
Häme University of Applied Sciences


